Oct 16, 2018 | 80/20 Guitar, Classical Guitar, Mastery & Talent, Mindful Music
The various pedagogies, methods and traditions used to teach music all have some things in common. Underlying the ideas and instruction in these methods is the notion of mindful intention. What is deciding how to hold and instrument, place your fingers, move your hands, and bring shape to a piece of music but applying intention to your actions? Viewed through the lens of today’s mindfulness practices, traditional music methods can be said to teach students what to focus on and how to be aware of various musical elements.
The main elements of mindfulness we will explore as it applies to music include: visualizing/mental imaging, focused listening, body awareness, and mindset. We will explore how these elements can improve your musical memory, musical pattern recognition and allow you to efficiently learn and process new technical skills by combining them with the proper mindset. This post is meant to be an introduction to these concepts and to help you begin applying them to your music practice and performance.
Visualizing/Mental Imaging
The human mind is a powerful tool and can be harnessed for almost superhuman feats if you know how it works. One of the most powerful examples of what the mind is capable of can be found with the memory champions. These normal people have developed methods and techniques to perform extraordinary memorization accomplishments. One of the most useful concepts from these folk is the idea that our brains are wired to grasp images, patterns, and visual queues fairly easily and quickly. (For more information about the memory techniques and competitions, check out the book “Moonwalking with Einstein” by Joshua Foer) We can apply this concept to music in many different ways. For example, when I was studying guitar as an undergrad, my teacher would have me put my guitar away in order to focus on the written music. I would review the sheet music with as much detail as possible, including dynamics, left hand positions and shapes, right hand fingering, etc. and then try to recall the image of the sheet in my mind as clearly as possible. This way, I could practice recalling the music in my mind without my guitar while on the bus, while driving, while walking or any other activity that didn’t require my full attention. I could also recall the image of the music and follow along while listening to the piece to help reinforce the sound with the image. After even just a week, I noticed I could play most of the piece from memory without many slips or stalls. In essence, I was practicing without my instrument in order to memorize the music! While you cannot use this as the sole way to practice a piece, you can use it as a way to reinforce your time with the instrument and solidify the music in your mind. Even better, bring in the mental image of how it physically feels to play the piece while going over the sheet music in your head, and you are now reinforcing the physical act of playing along with memorizing the music.
Visualizing Chords: A Beginning Method Example
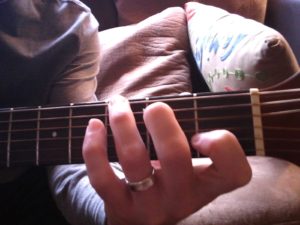
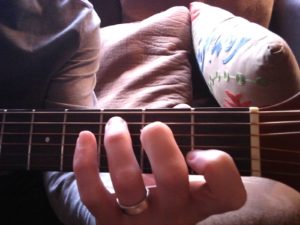
At the beginning level, I often introduce the concept of mental imaging to my students. It starts with the understanding that visual cues (written notation, TABs, chord diagrams and scale charts) are all there as guides to help communicate and represent a sound coupled with an action (playing the sound). For example, if you are learning a new chord for a song, the following procedure helps you ingrain it:
1 – find a visual diagram or chord diagram of the left hand shape for the new chord; think of it as a shape on the paper; make the shape with your left hand; observe the shape on your left hand and view it directly and through your peripheral vision; view yourself making the chord in a mirror;
2 – close your eyes and imagine the look of the chord in your left hand; notice the physical sensation of the left hand shape – are your fingers touching? are your knuckles touching,? does it feel bunched or spread out? where? is it hard or easy right now? Notice the strings each finger is on. Is it a thicker or thinner string?
3 – squeeze the left hand shape hard for 2 seconds and then release with your finger tips still touching the strings; do this repeatedly for 5 times; each time you squeeze, make note of the sensation of holding that shape
4 – strum the chord with your right hand multiple times; play the chord arpeggiated; sing along as your arpeggiate
5 – note where the 1,3 and 5 are in the shape from bottom to top and vise versa; ;
6 – Take of your left hand and shake it out to relax it; before putting it back on, think of the chord shape in both diagram images and physical sensations; imagine yourself making the chord in your mind;
7 – place the chord on as fast as you can;
8 – fit it into the context of the song you are learning – what are the particular finger movements from the preceding chord and then to the proceeding chord? are there any common fingers or frets? what is the lead finger for the movement? how can I make this simple?
9 – practice the changes in both directions; practice the changes and motions in your head – imagining in as much detail as possible, the feeling or physical sensation of making the shapes and motions.
This whole process should take about 5 to 10 minutes and will require complete immersion and focus. The good news is that it is fun and engaging, and if you do it consistently every day, then you will reap the benefits quickly. Whew!! That is an intense sensation and it will probably leave you a little drained as you start this practice, but after a while, you will notice that this practice will actually invigorate you and you will want to continue with more practice. I suggest leaving the instrument for at least 10 minutes before starting another session. This leaves time for the new information to seap into your brain and subconcious. When you do come back, try to recall the new shape without the aid of any written visual material. Try to recall the context of the chord and play through the changes, again without written materials. Remember, the written materials are there as an aid and require another layer of skill to practice in order to read the music, diagram or TAB fluently. In other words, you will find it faster and more rewarding to learn to play the chord rather than learning to read the chord. Eventually, with the same practice as above but with a little more emphasis on using the written material as a cue for the action of making the chord, you will learn to associate the visual image with the physical act of playing.
Now try applying this series to a new song you are learning. Take note of any mistaken fingerings, especially when trying to recall the chords. Then, move that finger or fingers to the correct place and play the chord; then move it back to the incorrect shape and play the chord and then back again to the correct shape and play the chord. This technique of ‘sandwiching’ the mistakes between the proper way will help your brain remember and establish the correct version.
In the next post in the series, we will explore more about visualizing and mental imaging in order facilitate memorizing and learning and then introduce the concept of a learning mindset.
I would love to hear if this concept works for you. Please leave a comment about how you used it to learn a new chord or song. Keep strumming!

Nov 13, 2017 | 80/20 Guitar, Mastery & Talent |
Most tasks can be categorized into either a hard skill or soft skill. An example of a hard skill includes being able to precisely play a G chord to C chord perfectly every time or being able to play the G major scale perfectly at a specific speed. A soft skill might include being able to use the G major scale while soloing or interpreting a passage of music and imbuing it with a certain emotion. The trick, Dan Coyle give as Tip #7 is to figure out if you are practicing a hard skill or soft skill.
Hard skills are about repeatable precision. On guitar, this can include: playing the correct notes for a piece of written music, playing a chord change consistently, knowing and playing your scales at a specific speed, being able to perform the tremolo technique, executing the rhythm of a written piece, playing arpeggios, rasguedo technique, recognizing the changes, and so on. Basically, anything that can be considered a technique or technical challenge – the physicality of playing the instrument and applying specific knowledge to execute consistently every time.
If hard skills are the physical aspects of playing, soft skills would be knowing how and when to apply the appropriate hard skills. Soft skills are about instantly recognizing patterns as they unfold and making smart, timely choices. In order to execute on your recognition, you must have the solid foundation of technique (aka hard skills). Some soft skills on guitar might include: sight reading, improvising, comping, interpreting written music, playing to an audience and so on. Soft skills are about being agile and interactive – you are constantly reading, recognizing, and reacting.
Tip #7 tells us to determine if we are practicing a hard or soft skill because there is a different approach to practicing each type. You must first be able to categorize the skills and notice the subtle difference between the two types in order to pick the appropriate mindset for practice and development.
The following three tips take this idea further, explaining the method of deep practice that work best to develop each type of skill.
Tip #8: To Build Hard Skills, Work Like a Careful Carpenter
Be careful, slow, and keenly attuned to errors. Make one simple move at a time, repeating and perfecting it before moving on. Pay attention to errors and fix them. This is where having a good teacher comes in. Often times as a novice, it is difficult to determine the errors and, furthermore, it is not always obvious how to fix them.
Coyle gives the example of the Suzuki Method for learning an instrument. He writes, “…they (students) learn to hold the bow without the violin, and go through the bowing motion. Each fundamental is worked on over and over until mastered. Precision is especially important early on because the brain is good at building connections but not so good at unbuilding them.” Read that last part again. If you had piano lessons as a child, maybe you went through the motions of learning scales and simple pieces before you could tackle pieces you actually wanted to play. You might have even quit before you got to the point of playing music you actually wanted to play. Many music teachers focus on the fundamentals and force kids to drill over and over because they know that learning a foundational skill the right way is easier than having to go back later to fix it. Though it might be boring to the student, these fundamentals are paramount to playing real music at a more advanced level.
Remember Daniel-son from the Karate Kid? Mr. Miyagi had him wax on and wax off and paint on and paint off every day for a considerable time. Now, remember why Daniel had to repeat these seemingly inconsequential motions? Mr. Miyagi was drilling the fundamental movements into Daniel’s motions and, therefore, teaching Daniel the basic movements to start practicing karate. If Daniel had neglected to follow Mr. Miyagi’s instructions, then when Mr. Miyagi went to test him by throwing a punch and kick, Daniel would have been knocked to the floor unable to block properly.
So next time you feel bored by drills or going over some basic techniques, remember that you might get punched in the face (proverbial speaking) when challenged with playing a piece of music if you did not prepare properly.
Important side note: a good teacher will make learning these fundamentals as fun and relevant as possible by guiding students through appropriate level pieces and techniques. Practicing the fundamentals does not have to be boring!
Tip #9: To Build Soft Skills, Play Like a Skateboarder
I used to skateboard from the time I was a kid until moving to college. It was a fun, addicting sport and I couldn’t wait to get home everyday to go out and skate. Each day, my friends and I would go out to find new spots or try new tricks on familiar spots – there was always a challenge or some new trick we were trying. Though there are definitely the hard skills of knowing how to ollie, kick flip etc., the challenge was always how to use those skills in new environments (over stairs, on new ledges, etc.) We would have to familiarize ourselves with new spots or new transitions and apply what we knew to new environments. As we rolled along on our skateboards, we would have to survey our passing environment and recognize obstacles and size them up in order to apply our tricks to the ever-changing landscape – constantly adjusting and reacting to the new terrain.
Soft skills are built by playing and exploring inside challenging, ever-changing environments. They are the result of super-fast brain software recognizing patterns and responding in just the right way. Some examples of soft skills on the guitar include: jamming with other musicians, live performances, improvising, and comping. These are places where you encounter different obstacles and respond to them over and over. To develop soft skills, you should explore, seek challenges and play. The goal with soft skills is to repeat them as often as possible in new ways and to get clear feedback. Do not focus on mistakes or errors – it is more important to explore and play. After each session ask yourself, “What worked? What didn’t? Why?”
For a more adult-oriented post about creating an environment to play with the soft skills, check out my post here. (Adult content warning)
Tip #10: Honor the Hard Skills
“Most talents are a combination of soft and hard skills. Prioritize the hard skills because in the long run they are more important to your talent.”
It is well known that many experts at the top of their fields stay sharp by drilling the fundamentals regularly. Case in point, Yo Yo Ma starts each session by playing single notes, working on tone and playing scales. You must keep the hard skills sharp in order to remain agile and apply them as needed. Being able to move your fingers fluidly and accurately allows you to play anything else you work on and apply the soft skills of musical interpretation, improvisation and creating music.
Most of us want to jump straight in to playing certain songs or learning that solo or playing like “that guy” (insert any guitar hero here). We often do not realize how many hours of dedicated work on fundamentals and basic technique goes into a performance. Hard skills will give you the technical prowess on the guitar but the soft skills are where most of the fun happens. The trick is to recognize there are 2 different modes of practicing and you must be clear as to which mode to apply when practicing. Prioritize the hard skills because it will enable you to perform the soft skills with clarity and ease. Use the hard skills to facilitate the soft skills. Relish the chances to explore and create. Jam with as many friends as possible, listen to many different musics, try to figure out that hot lick from your favorite solo and how to throw that in to your arsenal, figure out how to sound ‘oustide’ on your next solo break, throw out some funky chords, move those fingers around to find new chords and extensions, and remember to have fun while discovering new sounds.
Apr 20, 2017 | Blog, Group Lessons, Guitar Foundations, Lessons |
Benefits of Group Music Lessons
Guitar and mandolin group lessons are a great way to learn music. There are many advantages to taking group lessons. It can be a fun introduction to new students and a way to get your feet wet. It can also be a fun and challenging environment for more advanced players to work on skills not normally touched upon in private lessons. Some benefits to group lessons include:
- the friendly sense of competition and accountability helps motivate students and brings a built-in support group
- students are able to learn from each other and develop musical relationships that often continue outside of lessons
- the musical selections can be more varied and students have more performance opportunities
- you will learn how to play music with others and develop your listening skills in a practical setting
- improved rhythm and timing
- gives context to musical exercises and techniques
- provides a comfortable environment to work on songwriting and composition skills
- improves your reading ability
- allows the student room to develop improvisation and accompaniment skills
- lessons are more affordable and provide more opportunities for faster improvement
Group music lessons give immediate context for students to use techniques and knowledge to play in a musical setting. Students are encouraged to experiment and test their understanding of how to use the subject material in a real musical situation like jamming. Group play and making music with another human being is rewarding in and of itself, but the benefits of having to interact with other musicians will take the student to new musical heights that cannot be as easily attained by playing and practicing alone.
The main focus of group music lessons is to enhance the musical ability of the students. This means, that while individual lessons may still be needed in order to work on specific techniques and student issues, the musical aspects of playing will be the focus of the group time. The magic of playing with others and how that improves a music student’s abilities cannot be overstated. There is also the idea of group comradery and life long friendships forged from playing music together. Playing and learning together gives a great sense of accountability and positive peer pressure to achieve and keep up with the group. When partnered with other players of various abilities, students often learn new elements of music and technique from each other and reinforce their own understanding of the materials.
Group lessons are a great value for the student and an excellent setting for students to achieve their musical goals.